• Home Automation

    Hard-Wiring Sunsetter Awnings

    In 2022, I purchased some Sunsetter Awnings (through Costco). I opted for the solar-paneled versions, because these were going on the outside of the house and hard wiring them would be difficult. I figured we only really needed them during the summer months when the sun was out (the whole reason we’d put the awnings down anyway), so they wouldn’t see much use and should last a long time.

    Two years later, the batteries failed. Unfortunately, the company no longer offers a battery replacement (despite their warranty claiming they do) and their only recourse is to buy a new version of their solar panel unit.

    With our awnings stuck in mid-position, action needed to be taken. I took down one of the panels to investigate:

    It says “YD Ni-MH SC2200mAh 12V”. Multimeter is reading about 10 volts from the battery, which is pretty low because these should have plenty of charge after being in the sun all day. I’m also reading about 20 volts from the panel itself, so that seems to be working. One more test: hard-wiring a smaller battery to see if powering the shades directly works.
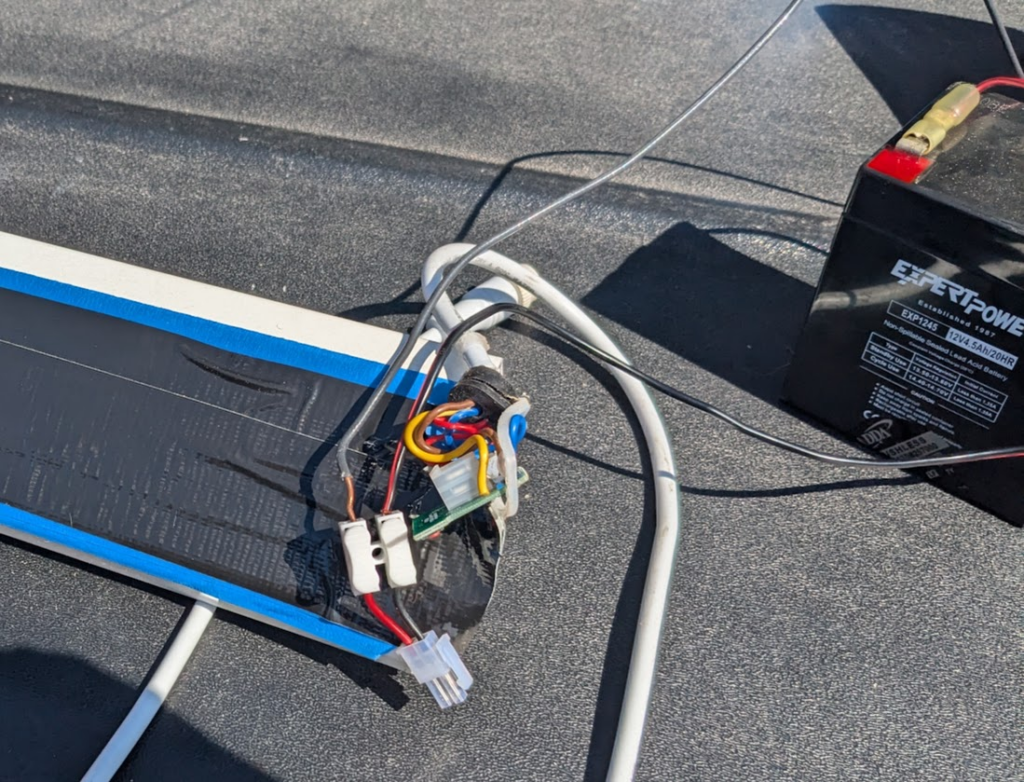
    I taped up the solar panel just to eliminate it as a variable. After hooking everything back up -except this time with my little battery here instead – the shades now work. All signs seem to confirm the battery is bad. Maybe I can find a replacement online:

    This must be why they won’t replace the battery… none seem to be available, except maybe all the way from China. 12 volts is a pretty convenient voltage though, and I’m guessing the shades don’t need a ton of power. I conveniently have another solar-powered battery backup using some 12 volt AGM batteries, so I decided to just hard-wire these things.

    I’m not replacing the batteries, and I don’t expect to use the solar panel attachments here ever again, so I’m just going to cut the wires and re-use them. Some reverse image searching indicates the wires are something like this, in case you’d want a neater solution.

    Next up is to identify the pinouts, so I plugged it in and took the multi-meter to it, and helpfully annotated it with my phone’s photo. Looks like a positive, a negative, and something not connected:

    These correspond to a blue (negative), brown (positive), and yellow (unused) wires. After connecting these directly to my 12V battery setup (with their own fuse), we’re back in business.
  • Truck

    2010 Toyota Tacoma: Head Unit Upgrade Overview

    There are plenty of aftermarket head units one can install, but where’s the fun in that? I’m also a big fan of tactile controls and those are getting harder and harder to find.

    There are a few general problems to solve (so far):

    1. Clean Shutdowns: When using a Raspberry Pi, you can’t just kill the power to it – it must shutdown cleanly. Failure to do that means you might have to run some commands to repair the filesystem, and at worst – a corrupt file system completely. It’s too much of a risk for something that needs to be reliable.
    2. Raspberry Pi Complexities: As much as the Pi has onboard already, it’s not a slam dunk. SD Cards are unbearably slow and unreliable. The last thing we want is a dead card making our head unit useless! SSDs are the way to go here, but they take up a USB slot – not that we’ll have enough anyway – so we’ll need a hub to add on. Oh, and we’ll need a powered hub to boot, to keep things stable. We’ll also need a strong and stable 5V power source for it all.
    3. Audio Noise: This particular vehicle has an “upgraded” JBL Audio system, and uses a digital signal from the head unit. This means I can’t send audio easily to the amplifier, because I don’t know what the format is. I’ll probably upgrade the amplifier while I’m a it, so I’m not going to bother to find out. The problem is that the wires from the head unit to the amplifier were intended for digital signals, and become too electrically noisy to run audio over.
    4. Electrical System Noise: The nominal voltage of a typical car’s electrical system is 12 volts, but it can be as high as 14 volts (the charging voltage of your car battery), and starting the car can causes spikes of dozens of volts.
    5. AUX Input: It’d be nice to keep this if possible. I will use a hardware equalizer that has a switchable input, but it’s a manual switch. This problem will become even more complex when I add a HAM or CB radio.
    6. Offline Power: Wouldn’t it be nice to be able to run things without needing the car to be on? Case in point, we were on the ferry recently and it’s too risky to run down your battery.
    7. Aesthetics: I’m an engineer, not an artist. Things are going to get messy.

    I don’t have solutions for everything yet, but I’ll try to add more as I go along.

    System Diagram

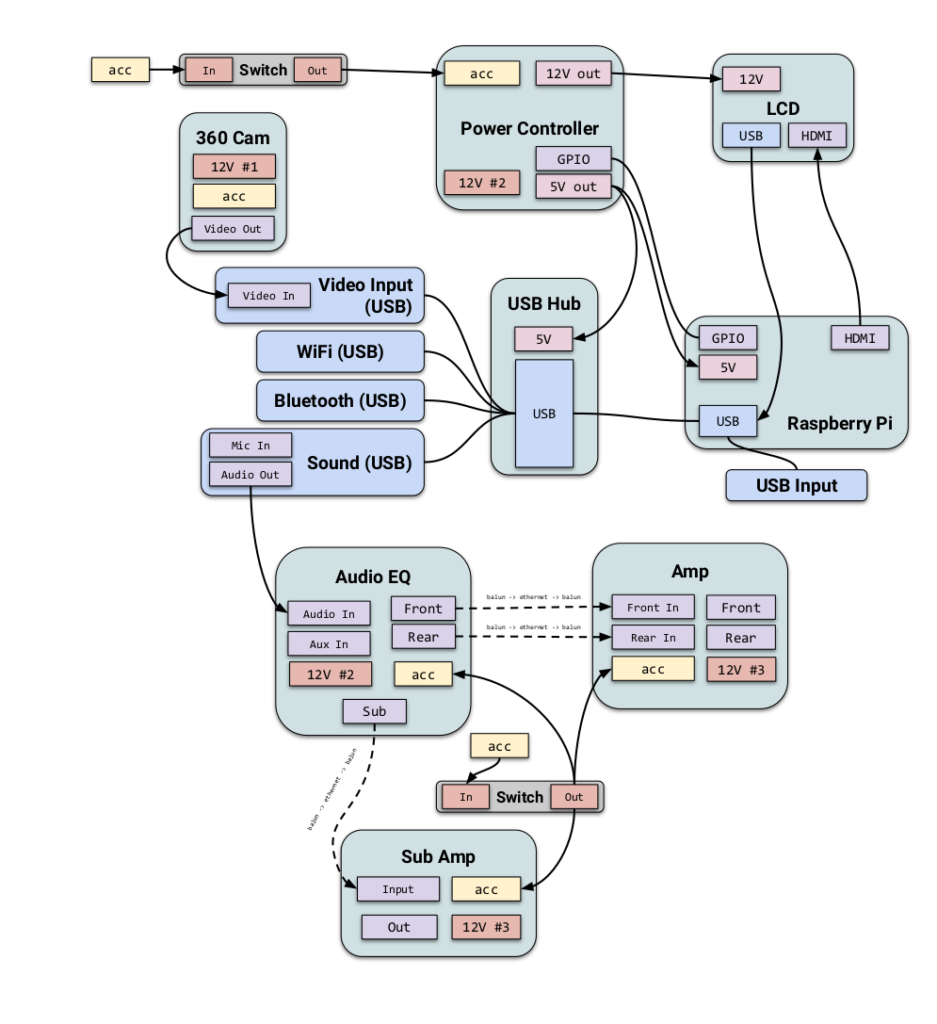
    Here’s how the system should look, if all goes well:

    As with all projects, I’m sure things will evolve and change over time so this plan is likely to change!